

How to lock and protect cells in Excel is a common question from people who work with important data and tricky spreadsheets. Knowing how to lock and protect cells in Excel helps keep your formulas safe, stops people from changing things by mistake, and keeps your sheets correct when working with others.
If you handle money reports, track items, or build dashboards, learning how to protect cells is key. It helps keep your data safe and lets you control who can change what. This full guide will show you everything you need to know — from the basics to the tricks used by experts everywhere.
Must Read: 100 Innovative Sustainability Project Ideas for Students
Introduction to Cell Locking and Protection
What is Cell Locking and Protection?
Cell locking and protection in Excel helps stop people from changing certain cells, ranges, or full sheets. It works in two parts:
- Locking is what marks a cell as protected.
- Protecting is when you turn on the sheet-level protection.
These two parts let you control what people can edit. You can lock your formulas but still let people type data where needed.
This system is super helpful when you share files with others. It keeps your important formulas safe while letting others add data where you want them to. This helps stop mistakes and keeps your data right.
Why is Cell Protection Important?
Cell protection keeps your data safe. Some key reasons are:
- Stops people from deleting or breaking formulas by mistake.
- Keeps data correct when many people use the file.
- Protects your special formulas and ideas.
- Keeps the look of your reports the same.
- Lets you control what different team members can change.
When a lot of people work on the same sheet, mistakes can happen fast. Protection makes sure everyone can only change what they’re supposed to, and your important work stays safe.
Understanding Core Concepts: Locked vs Unlocked Cells
The Default State: All Cells are Locked
Here’s a part that confuses people:
- All cells are locked by default — but you can still edit them.
- The lock doesn’t do anything until you protect the sheet.
- Locking is just getting ready for protection.
- Until you protect the sheet, the lock doesn’t stop anyone from editing.
Many new users protect a sheet without setting it up first. Then they wonder why they can’t edit anything! That’s why it’s important to understand this part.
Identifying Cell Protection Status
You can check if a cell is protected by:
- Right-clicking and picking Format Cells, then going to the Protection tab.
- Looking for two boxes: Locked and Hidden.
- Seeing what happens when you try to edit — protected cells will give an error message.
Some pros use cell styles with colors or borders to show which cells are locked. This makes things clearer for everyone and cuts down on help requests.
Step-by-Step Guide: Locking and Protecting Specific Cells
Step 1: Prepare Your Worksheet
Before you turn on protection:
- Pick out the cells that people should be able to edit.
- Mark your formulas and headers that should stay safe.
- Make a plan or map of what you’ll protect.
- Test your plan on a copy of your sheet first.
Think about how people will use your sheet. Make sure it’s easy for them to know where to type and where not to.
Step 2: Unlock Cells for User Editing
Do this to set up cells for typing:
- Select the cells where people can enter data.
- Hold Ctrl to pick many areas at once.
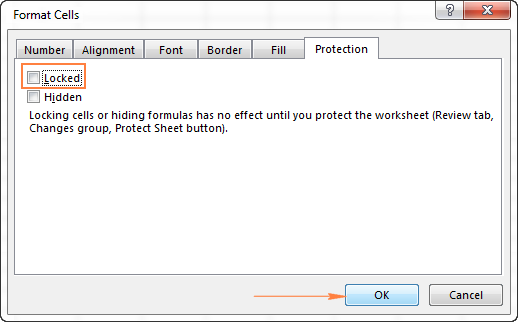
- Right-click, choose Format Cells.
- Go to Protection tab and uncheck Locked.
- Click OK to save (this won’t work until you protect the sheet).
You can still edit everything until you protect the sheet. This lets you finish setup before locking things down.
Step 3: Protect the Worksheet
To protect your sheet:
- Go to Review tab and click Protect Sheet.
- Type a password (this is a good idea).
- Pick what users are allowed to do (like selecting cells or formatting).
- Check the boxes that match what you want.
You can also let users do things like insert rows or use filters. This helps you give people the right level of access.
Step 4: Confirm Protection Settings
Once protected:
- Click OK and confirm your password.
- Try editing locked and unlocked cells to test it.
- Make sure your formulas are safe and data areas work.
- Check that your other settings (like formatting) are good.
- Write down the password and settings in a safe spot.
It’s smart to make a checklist to test your protection on each sheet.
Advanced Protection Scenarios
Protecting Formulas While Allowing Data Entry
To do this:
- Mark all your formula cells.
- Mark data entry spots.
- Use colors or borders to show what’s what.
- Test to make sure formulas still update when data changes.
You might also add a note or guide sheet to help people know where to type and where not to.
Hiding Formulas from View
To hide formulas:
- Pick the formula cells.
- Right-click, choose Format Cells, go to Protection tab.
- Check both Locked and Hidden.
- Protect the sheet to hide the formulas.
Now, people will see the result of the formula but not the formula itself.
Protecting Specific Ranges with Different Permissions
To give different people different access:
- Go to Review tab, click Allow Users to Edit Ranges.
- Click New, set a name and range.
- Add a password for that range.
- Do this before protecting the sheet.
This is great for teams where people need access to different parts of the sheet.
Protecting Entire Workbooks
To protect the structure:
- Go to Review tab, click Protect Workbook.
- Choose Structure to stop changes to sheets.
- Add a password.
- You can also pick Windows for old Excel versions.
This keeps people from adding, deleting, or renaming sheets.
Unprotecting Cells, Sheets, and Workbooks
Unprotecting Sheets and Workbooks
To unprotect:
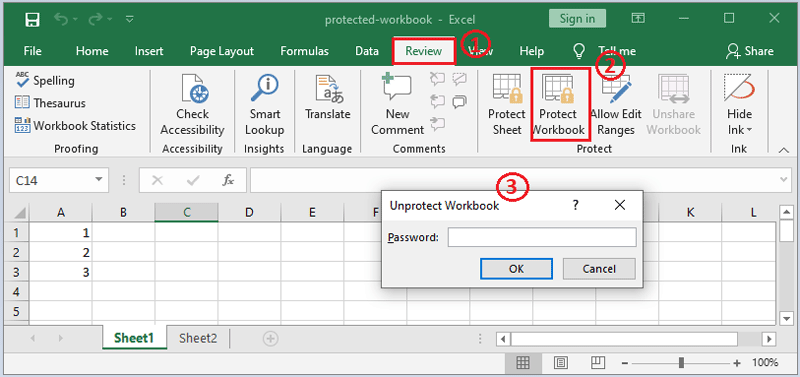
- Go to Review tab, click Unprotect Sheet or Unprotect Workbook.
- Type the password.
- Test to make sure protection is off.
- Make changes and reapply protection if needed.
Once unprotected, cells can be edited again. The lock setting stays for the next time you protect.
Reverting Cell Locking Properties
To change locked cells:
- Select the cells.
- Right-click, choose Format Cells.
- Go to Protection tab and change the Locked box.
- Click OK (this only matters when sheet is protected).
All cells start out locked, so usually you’ll uncheck this for editable areas.
Best Practices and Professional Tips
Planning Your Protection Strategy
Plan ahead:
- Make a map of who can do what.
- Write down your plan, passwords, and reasons for protection.
- Test with real users before going live.
- Think about how you’ll keep things updated.
Plan for the future so changes don’t mess up your protection.
Password Management and Security
For password safety:
- Use hard-to-guess passwords (letters, numbers, symbols).
- Don’t use easy words or personal info.
- Keep passwords safe in a manager.
- Write down how to recover if you forget.
Excel protection isn’t top-level security, but good password habits make it stronger.
Visual Cues and User Communication
Make protection clear:
- Use cell colors or borders to show what’s safe to edit.
- Keep the look the same across all sheets.
- Add comments or notes that explain the protection.
- Give users a simple guide.
This helps people know what to do and stops mistakes.
Common Issues and Troubleshooting
Cells Still Editable After Protection
This happens when:
- You didn’t lock the cells before protecting.
- Some cells were unlocked earlier and stayed that way.
- Check with Format Cells to see if they’re locked.
- Unprotect, fix it, and protect again.
Double-check your settings before turning on protection.
Formula Visibility and Hidden Property Issues
If formulas still show:
- Make sure sheet protection is on.
- Check that Locked and Hidden are both selected.
- Make sure you’re checking the right cells.
Hiding stops the formula from showing, but it’s not real security. People can still find formulas if they try hard enough.
Password Recovery and Access Issues
Excel won’t help you recover a lost password:
- There are outside tools, but they’re not official.
- The best plan is to keep good notes.
- Use a password manager.
- Keep safe backup copies of your files.
Having a backup is always a smart move.
Must Read: 268+ Community Project Ideas for Students: Tips, Benefits & Examples
Conclusion and Advanced Applications
Knowing how to lock and protect cells in Excel gives you strong control over your data. You can keep your sheets safe while letting your team work on them too.
Learning these tools helps cut down on mistakes, makes your data better, and helps teams work together. Start using these steps today, and as you get better, you can try advanced tools like VBA to add even more protection and connect with other Office programs.
