

How to customize the Excel ribbon toolbar? A lot of people ask this when they want to make Excel easier to use and save time. Learning how to customize the ribbon toolbar can turn Excel from a confusing program into one that fits your needs perfectly.
The truth is, a ribbon that works the way you want can make Excel much easier. You’ll click less, stop searching for tools, and work in a way that matches how you like to do things.
In this guide, I’ll show you everything you need to know to change the Excel ribbon. From easy edits to more advanced setups, you’ll learn how to make Excel work better for you.
Must Read: Can Excel Connect to Databases? The Ultimate Guide to Database Integration in 2025
Understanding the Excel Ribbon: Your Digital Command Center
What is the Excel Ribbon and Why Does It Matter?
The Excel ribbon replaced old menus in 2007. It made the screen more organized and easier to use. Here’s why it helps:
- Easier to See: Commands are out in the open, not hidden in menus
- Grouped by Purpose: Similar tools are together under tabs and sections
- Smart Display: Special tools show up only when you need them
- Faster Searches: The clear layout means less digging to find things
The Hidden Cost of Default Settings
Most people use Excel the way it comes, but that can slow them down:
- Breaks in Workflow: Tools you use a lot may be in different places
- Wasted Time: Those extra clicks add up over time
- Hard to Work Your Way: Excel makes you follow its setup instead of yours
- Not Personal: The default layout may not match how you like to work
Components That Make Up Your Ribbon
Knowing what’s in the ribbon helps when you want to change it:
- Tabs: Main sections like Home, Insert, and Data
- Groups: Smaller parts inside tabs, like Font or Alignment
- Commands: Buttons or tools inside groups
- Contextual Tabs: Extra tabs that show up only when needed (like Chart Tools)
Accessing Ribbon Customization: Two Simple Paths
The Right-Click Method: Quick and Direct
This is the fastest way to start customizing:
- Super Fast: Right-click on the ribbon to open the options
- Easy to Use: Works no matter what tab you’re on
- No Distractions: You can change things while still working
- Works Everywhere: Same process in all parts of Excel
The Menu Method: Complete Access
Use this way for bigger changes: File > Options > Customize Ribbon.
- Full Control: You see all the ways you can change the ribbon
- Do More at Once: You can adjust other Excel settings, too
- Great for Guides: Easy to teach others this method
- Plan Ahead: Best when doing lots of ribbon changes
Basic Customization: Adding and Removing Commands
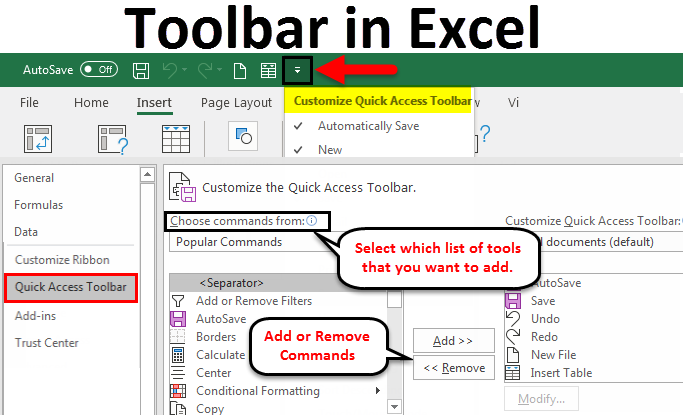
Understanding the Customization Interface
The customization screen has two sides:
- Left Side: List of all tools you can add, like macros or popular commands
- Right Side: What your ribbon looks like now, shown as a tree with tabs and groups
- Action Buttons: Add, Remove, Rename, and Move commands around
- Command List: Choose what kind of tools to see (macros, popular, etc.)
Adding Commands to Existing Groups
Here’s how to add a tool to a group:
- Pick a Spot: Click the tab and group where you want the tool
- Pick a Tool List: Choose from All Commands, Popular, or Macros
- Pick a Tool: Click the tool you want to add
- Add It: Click “Add” and it goes to your chosen group
Removing Unwanted Commands
Removing tools makes the ribbon cleaner and faster to use:
- Find the Tool: Open tabs and groups to see what’s there
- Click It: Select the one you want to remove
- Delete It: Click “Remove” to take it out
- Note: You can’t remove single tools from built-in groups—only whole groups
Advanced Customization: Creating Your Personal Command Center
Building Custom Tabs from Scratch
Making your own tab gives you full control:
- Make a Tab: Click “New Tab” to add one
- Name It: Use names like “Reports” or “My Tools”
- Move It: Drag it where you want it on the ribbon
- Mix Tools: Add tools from different parts of Excel into one place
Organizing Commands into Logical Groups
Grouping tools the right way saves time:
- Add Groups: Click “New Group” to make a section
- Name Clearly: Use names like “Charts” or “Quick Fixes”
- Sort by Task: Arrange tools by what you do first, second, third
- Use Icons: Choose pictures to help find tools faster
Strategic Command Placement
Think about where you put your tools:
- Left Side: Put your most-used tabs first
- Order Tools by Use: Most-used tools go at the top of the group
- Task Order: Place tools in the order you use them
- Think Visually: Arrange tools left-to-right like how we read
Working with Macros and Add-ins
Adding Macros to Your Ribbon
Macros let you do tasks faster, and you can put them on your ribbon:
- Find Macros: Select “Macros” from the left-side list
- Use Custom Groups: Macros can only go in new groups, not built-in ones
- Rename Them: Give your macro a name and icon that makes sense
- Stay Organized: Put macros in a group like “My Shortcuts”
Integrating Add-in Commands
Add-ins give Excel new tools you can add to your ribbon:
- Find Them: Look under “Commands Not in the Ribbon” or in the add-in list
- Keep It Together: Add them to groups you’ve made
- Group Smartly: Mix add-in tools with built-in ones if they go together
- Auto Tabs: Some add-ins create their own tabs—you can move tools if needed
Enabling the Developer Tab
The Developer tab gives you powerful tools for automation:
- Turn It On: Check “Developer” in the right-side list
- Extra Tools: Includes macros, controls, and XML stuff
- Mix Tools: Move Developer tools to your own groups
- Power Users: This tab is a must for automation lovers
Importing and Exporting Customizations
Creating Backup Copies of Your Setup
Keep a copy of your setup in case something goes wrong:
- Export It: Click “Import/Export” > “Export all customizations”
- Save It Safe: Store it on your computer, cloud, or a USB
- Do It Often: Back up before you make big changes
- Use Dates: Name files by date so you know which is newest
Sharing Customizations with Team Members
You can share your ribbon setup with others:
- Send the File: Give your export file to coworkers
- Explain It: Let them know why it’s organized that way
- Make Role Versions: Create different versions for different team jobs
- Test First: Check that the file works on everyone’s Excel
Transferring Settings Between Computers
Move your setup to a new computer easily:
- Export First: Save the file from your old computer
- Import After: Load it onto your new computer
- Don’t Overwrite: Back up the new computer’s setup first
- Check Company Rules: Some jobs may not let you do this
Resetting and Managing Your Customizations
Selective Resets for Fine-Tuning
You can reset just part of your setup if needed:
- Pick a Tab: Choose one that needs fixing
- Click Reset: Use “Reset only selected Ribbon tab”
- Keep the Good Stuff: Fix what’s broken without losing the rest
- Start Over Clean: Helps clear out cluttered tabs
Complete Reset: Starting Over
Wipe everything clean if needed:
- Go Default: Click “Reset all customizations” to go back to the beginning
- Back It Up: Save your setup first before you reset
- Use When Needed: Good if you’re taking over someone’s messy setup
- Build Again: You can import old setups after a full reset
Troubleshooting Common Ribbon Issues
Missing Commands and Functionality Problems
Solve ribbon problems step by step:
- Tool Missing: Some commands aren’t in all Excel versions
- Add-in Problems: Add-in tools need the add-in to be installed
- Permission Blocks: Some jobs limit what you can change
- Version Issues: Tools from newer Excel might not work in older versions
Performance and Display Issues
Fix ribbon slowdowns and screen problems:
- Too Many Tools: Overloading the ribbon slows it down
- Slow Icons: Custom icons can load slowly
- Memory Use: Big setups use more computer power
- Screen Scaling: High-res displays can mess with how the ribbon looks
Advanced Ribbon Strategies for Power Users
Role-Based Customization Approaches
Change the ribbon based on your job:
- Financial Work: Add tools for charts, formulas, and formatting
- Data Management: Use tools for cleaning and fixing data
- Report Writing: Keep formatting and printing tools close
- Project Work: Add tracking and planning tools
Workflow-Specific Tab Creation
Make tabs for full work processes:
- Data Work: Put import, clean-up, and analysis tools in one tab
- Reports: Group all tools you need to build and format reports
- Quality Checks: Use tools for fixing and checking data
- Client Work: Keep tools for charts, exports, and final touches
Pro Tips for Ribbon Mastery
Workflow Analysis: The Foundation of Smart Customization
Know how you use Excel before you change it:
- Track Use: Write down what tools you use for a week
- Find Favorites: Look for tools you use all the time
- Watch Your Moves: Track how often you switch tabs
- Measure Time: See how much time you save after changes
The Power of Logical Grouping
Good grouping makes Excel easier:
- Use Tasks: Group tools by the job you’re doing
- Make It Yours: Match groups to how you think
- Temporary Tabs: Make special tabs for big projects
- Name Clearly: Use names that show what each group does
Balancing Customization and Standardization
Customize without making things confusing for others:
- Add, Don’t Replace: Keep default tools, just add your own
- Write It Down: Explain your setup for future reference
- Use Profiles: Try different setups for different projects
- Tweak Over Time: Keep changing things as your work changes
Must Read: Is Excel Compatible with Power BI? Your Complete Integration Guide for 2025
Conclusion: Transform Your Excel Experience Today
Customizing the Excel ribbon is more than just moving buttons. It’s about building a setup that helps you work faster and smarter every day.
Start by adding one or two tools you use all the time. Once you get used to it, make full custom tabs for different kinds of work.
Remember, your work will change over time. Keep your ribbon up to date so it always fits your needs.
You don’t need every tool—just the ones that help you most. The best ribbon feels easy. You won’t even think about it—you’ll just work.
Get started now. Right-click your ribbon, add one tool you use every day, and feel the difference. That one change can make your whole Excel experience better.
